

The course includes:
In sewing and fashion design, a pattern is the template from which the parts of a garment are traced onto fabric before being cut out and assembled. Patterns are usually made of paper, and are sometimes made of sturdier materials like paperboard or cardboard if they need to be more robust to withstand repeated use. The process of making or cutting patterns is sometimes condensed to the one-word Patternmaking but it can also be written pattern making or pattern cutting.
A sloper pattern (home sewing) or block pattern (industrial production) is a custom-fitted, basic pattern from which patterns for many different styles can be developed. The process of changing the size of a finished pattern is called grading.
Several companies specialize in, usually employing at least one specialized patternmaker. In bespoke clothing, slopers and patterns must be developed for each client, while for commercial production, patterns will be made to fit several standard body sizes.
The flat-pattern method is where the entire pattern is drafted on a flat surface from measurements, using rulers, curves and straight-edges. A pattern maker would also use various tools such as a notcher, drill and awl to mark the pattern. Usually, flat patterning begins with the creation of a sloper or block pattern, a simple, fitted garment made to the wearer's measurements. For women, this will usually be a jewel-neck bodice and narrow skirt, and for men an upper sloper and a pants sloper. The final sloper pattern is usually made of cardboard or paperboard, without seam allowances or style details (thicker paper or cardboard allows repeated tracing and pattern development from the original sloper). Once the shape of the sloper has been refined by making a series of mock-up garments called toiles (UK) or muslins (US), the final sloper can be used in turn to create patterns for many styles of garments with varying necklines, sleeves, dart placements, and so on. The flat pattern drafting method is the most commonly used method in menswear; menswear rarely involves draping. There are many pattern making system available, but M. Muller & Sohn (http://germanpatternmaking.com) is widely used for its accuracy and fit for different body figure.
The draping method involves creating a muslin mock-up pattern by pinning fabric directly on a form, then transferring the muslin outline and markings onto a paper pattern or using the muslin as the pattern itself. [1]
Although a sewer may choose to use a standard size that has been pre-graded on a purchased pattern, they may decide to tailor a pattern to better fit the garment wearer. There are several ways this can be done.
Creating a sewer's muslin, similar to a garment template, is one method of fitting. Muslin material is inexpensive and is easy to work with when making quick adjustments by pinning the fabric around the wearer or a dress form. The sewer cuts muslin pieces using the same method that they will use for the actual garment, according to a pattern. The muslin pieces are then fit together and darts and other adjustments are made. This provides the sewer with measurements to use as a guideline for marking the pattern pieces and cutting the fabric for the finished garment.[2]
The majority of modern day home sewing patterns contain multiple sizes in one pattern. Once a pattern is removed from a package, you can either cut the pattern based on the size you will be making or you can preserve the pattern by tracing it. The pattern is traced onto fabric using one of several methods. In one method, tracing paper with transferable ink on one side is placed between the pattern and the fabric. A tracing wheel is moved over the pattern outlines, transferring the markings onto the fabric with ink that is removable by erasing or washing.[10] In another method, tracing paper is laid directly over a purchased pattern, and the pieces are traced. The pieces are cut, then the tracing paper is pinned and/or basted to the fabric. The fabric can then be cut to match the outlines on the tracing paper. Vintage patterns may come with small holes pre-punched into the pattern paper. These are for creating tailor's tacks, a type of basting where thread is sewn into the fabric in short lengths to serve as a guideline for cutting and assembling fabric pieces.
Besides illustrating the finished garment, pattern envelopes typically include charts for sizing, the number of pieces included in a pattern, and suggested fabrics and necessary sewing notions and supplies.
Ebenezer Butterick invented the commercially produced graded home sewing pattern in 1863 (based on grading systems used by Victorian tailors), originally selling hand-drawn patterns for men's and boys' clothing. In 1866, Butterick added patterns for women's clothing, which remains the heart of the home sewing pattern market today.[citation needed]
Pattern Making
Pattern making is a highly skilled technique which calls for technical ability, and a sensitivity to interpret a design with a practical understanding of garment construction. For successful dress designing pattern making forms the fundamental step. This function connects design to production by producing paper templates for all components such as cloth, hemming, fusible etc. which have to be cut for completing a specific garment.
Pattern making is an art. It is the art of manipulating and shaping a flat piece of fabric to conform to one or more curves of the human figure. Pattern making is a bridge function between design and production. A sketch can be turned into a garment via a pattern which interprets the design in the form of the garment components. A pattern is flat while the body is not. The body has height, width and depth. Within this roughly cylindrical framework there are a series of secondary curves and bulges, which are of concern to the pattern maker. Darts are the basis of all pattern making. They convert the flat piece of cloth into a three dimensional form, which fits the bulges of the body.
A pattern maker typically makes a pattern from a flat sketch with measurements or a two dimensional fashion illustration. The basic pattern is the very foundation upon which pattern making, fit and design are based. The basic pattern is the starting point for flat pattern designing. It is a simple pattern that fits the body with just enough ease for movement and comfort.
Methods of Pattern Making
Pattern making involves three methods-
MEASUREMENTS
Bust – measure just under the arms around the fullest part of chest.
Waist – measure around narrowest part of torso.
High Hip – measure 6 inches [15.5 cm] below waist around the hips.
Back-waist length – measure from nape of neck to waist level
Shoulder length – measure shoulder from ball socket to side of neck.
Armhole depth – measure from nape of neck to under arm level.
Back width – measure from armhole to armhole across shoulder blades.
Neck – measure around base of neck.
Tools use for Drafting
A: Tape Measure
This is likely something you already have in your stash, because if you have been making clothing you should have been measuring your body along the way! If not, pick up a good quality fiberglass tape measure today so you can start your pattern making off right with correct body measurements.
B: Seam Ripper
Like the tape measure, you probably have a seam ripper. You will use this in patternmaking for taking out your basting stitches when you move from the muslin fitting to the pattern drafting stage.
C: Fine Point Sharpie Marker
Muslin versions are always ugly because they are marked up, but you want to make your markings with a permanent and fine point. I like these push-button fine point sharpie pens as the cap always seems to get lost in my studio! These are quick and easy to use.
D: Tracing Wheel
To take your markings from the muslin stage to the patternmaking stage, this tool will pierce through the paper and leave behind marks to draft with a mechanical pencil.
E: Rotary Cutter
I like using my rotary cutter for the big broad strokes of cutting muslin. Make sure to use a cutting mat beneath your item to protect the cutting surface of the table underneath!
F: Fabric Scissors
Sharp, high-quality scissors are used for all your fabric cutting in sewing and patternmaking. These will shape the muslin down to the proper size after you have cut it big and broad with the rotary cutter.
G: Tracing Paper
I personally do not use this, but many designers like it for leaving marks behind on their muslins. I like a sharpie or tracing wheel, but try these sheets out and perhaps you will love them! Many people do.
H: Scotch Tape
It is inevitable that you will need to tape pattern pieces together and I find that basic Scotch tape is the best for this.
I: Clear Rulers
Having a variety of clear rulers in different shapes and sizes is essential in your kit for patternmaking. I like having a little one for marking in tiny areas, long ones for making marks for pin tucks, side seam lines, and other parts of the patternmaking process that call for something longer than average. I also have a quilting square with diagonal lines for helping square up corners and creating angles.
J: Right Angle
This is also a huge help in creating perfect 90 degree angles on your pattern. These are also available in clear plastic, which most people prefer. I have had this black one since art school and still use it.
K: Curved Rulers
To shape arm holes, hip curves, hems and other lines that are not straight in patternmaking, it is essential that you have a few different curved rulers to get the proper slope in your pattern.
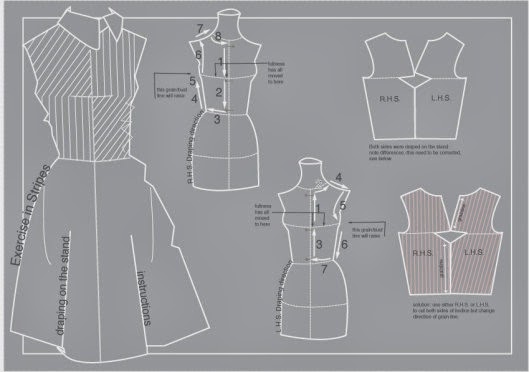
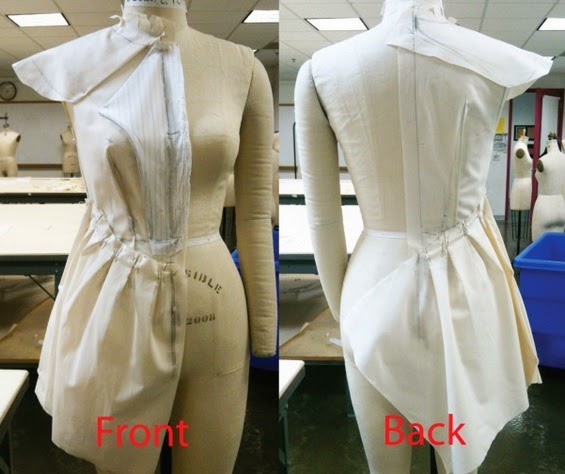
02. Draping: It involves
the draping of a two dimensional piece of fabric around a form,
conforming to its shape, creating a three-dimensional fabric
pattern. Ease allowances for movement are added to make the garment
comfortable to wear. Advantage of draping is that the designer can see
the overall design effect of the finished garment on the body form
before the garment piece is cut and sewn. However, it is more expensive
and time consuming than flat pattern making. Draping can be made on a
Human body or on a stand.
03. Flat Pattern Making: It involves the development of a fitted basic pattern with comfort ease to fit a person or body form. A sloper is the starting point for flat pattern designing. It is a simple pattern that fits the body with just enough ease for movement and comfort. Five basic pattern pieces are used for women’s clothing. They include a snug-fitting bodice front and bodice back with darts and a basic neckline, a sleeve and a fitted skirt front and back with darts. However, as fashion changes frequently women’s styles fluctuate frequently. These basic slopers are then manipulated to create fashions. Nowadays draping is also tested by Computer aid techniques. A basic sloper has no seam allowances, which facilitates its manipulations to various styles. It has no design interest, only construction lines are marked on it. It is necessary that the basic structure of a sloper should be such that adjustments can be introduced easily. For a good pattern making, accurate measurements are of utmost importance.
The flat pattern making method is widely used in the ready-to-wear market because it is fast and accurate (Aldrich).
- Computerised pattern development techniques
- Pattern input via digitising
- Computerised pattern development techniques
- Converting traditional grading methods into computerised techniques
- Lay planning/costing
- Creating line drawings for range boards and specification sheets.
In sewing and fashion design, a pattern is the template from which the parts of a garment are traced onto fabric before being cut out and assembled. Patterns are usually made of paper, and are sometimes made of sturdier materials like paperboard or cardboard if they need to be more robust to withstand repeated use. The process of making or cutting patterns is sometimes condensed to the one-word Patternmaking but it can also be written pattern making or pattern cutting.
A sloper pattern (home sewing) or block pattern (industrial production) is a custom-fitted, basic pattern from which patterns for many different styles can be developed. The process of changing the size of a finished pattern is called grading.
Several companies specialize in, usually employing at least one specialized patternmaker. In bespoke clothing, slopers and patterns must be developed for each client, while for commercial production, patterns will be made to fit several standard body sizes.
Pattern making:
A patternmaker typically employs one of two methods to create a pattern.The flat-pattern method is where the entire pattern is drafted on a flat surface from measurements, using rulers, curves and straight-edges. A pattern maker would also use various tools such as a notcher, drill and awl to mark the pattern. Usually, flat patterning begins with the creation of a sloper or block pattern, a simple, fitted garment made to the wearer's measurements. For women, this will usually be a jewel-neck bodice and narrow skirt, and for men an upper sloper and a pants sloper. The final sloper pattern is usually made of cardboard or paperboard, without seam allowances or style details (thicker paper or cardboard allows repeated tracing and pattern development from the original sloper). Once the shape of the sloper has been refined by making a series of mock-up garments called toiles (UK) or muslins (US), the final sloper can be used in turn to create patterns for many styles of garments with varying necklines, sleeves, dart placements, and so on. The flat pattern drafting method is the most commonly used method in menswear; menswear rarely involves draping. There are many pattern making system available, but M. Muller & Sohn (http://germanpatternmaking.com) is widely used for its accuracy and fit for different body figure.
The draping method involves creating a muslin mock-up pattern by pinning fabric directly on a form, then transferring the muslin outline and markings onto a paper pattern or using the muslin as the pattern itself. [1]
Pattern digitizing
After a paper/fabric pattern is completed, very often pattern-makers digitize their patterns for archiving and vendor communication purposes. The previous standard for digitizing was the digitizing tablet. Nowadays, automatic option such as scanner and cameras systems are available.Fitting patterns
Although a sewer may choose to use a standard size that has been pre-graded on a purchased pattern, they may decide to tailor a pattern to better fit the garment wearer. There are several ways this can be done.
Creating a sewer's muslin, similar to a garment template, is one method of fitting. Muslin material is inexpensive and is easy to work with when making quick adjustments by pinning the fabric around the wearer or a dress form. The sewer cuts muslin pieces using the same method that they will use for the actual garment, according to a pattern. The muslin pieces are then fit together and darts and other adjustments are made. This provides the sewer with measurements to use as a guideline for marking the pattern pieces and cutting the fabric for the finished garment.[2]
Pattern grading
Pattern grading is the process of shrinking or enlarging a finished pattern to accommodate it to people of different sizes. Grading rules determine how patterns increase or decrease to create different sizes. Fabric type also influences pattern grading standards.[3] The cost of pattern grading is incomplete without considering marker making.[4]Standard pattern symbols
Sewing patterns typically include standard symbols and marks that guide the cutter and/or sewer in cutting and assembling the pieces of the pattern. Patterns may use:[5][6]- Notches, to indicate:
- Seam allowances. (not all patterns include allowances)
- Centerlines and other lines important to the fit like the waistline, hip, breast, shoulder tip, etc.
- Zipper placement
- Fold point for folded hems and facings
- Matched points, especially for long or curving seams or seams with ease. For example, the Armscye will usually be notched at the point where ease should begin to be added to the sleeve cap. There is usually no ease through the underarm.
- Circular holes, perhaps made by an awl or circular punch, to indicate:
- A dart apex
- Corners, as they are stitched, i.e. without seam allowances
- Pocket placement, or the placement of other details like trimming
- Buttonholes and buttons
- A long arrow, drawn on top of the pattern, to indicate:
- Grainline, or how the pattern should be aligned with the fabric. The arrow is meant to be aligned parallel to the straight grain of the fabric. A long arrow with arrowheads at both ends indicates that either of two orientations is possible. An arrow with one head probably indicates that the fabric has a direction to it which needs to be considered, such as a pattern which should face up when the wearer is standing.
- Double lines indicating where the pattern may be lengthened or shortened for a different fit
- Dot, triangle, or square symbols, to provide "match points" for adjoining pattern pieces, similar to putting puzzle pieces together
Patterns for commercial clothing manufacture
The making of industrial patterns begins with an existing block pattern that most closely resembles the designer's vision.[7] Patterns are cut of oak tag (manila folder) paper, punched with a hole and stored by hanging with a special hook. The pattern is first checked for accuracy, then it is cut out of sample fabrics and the resulting garment is fit tested. Once the pattern meets the designer's approval, a small production run of selling samples are made and the style is presented to buyers in wholesale markets. If the style has demonstrated sales potential, the pattern is graded for sizes, usually by computer with an apparel industry specific CAD program. Following grading, the pattern must be vetted; the accuracy of each size and the direct comparison in laying seam lines is done. After these steps have been followed and any errors corrected, the pattern is approved for production. When the manufacturing company is ready to manufacture the style, all of the sizes of each given pattern piece are arranged into a marker, usually by computer.[8] A marker is an arrangement of all of the pattern pieces over the area of the fabric to be cut that minimizes fabric waste while maintaining the desired grainlines. It's sort of like a pattern of patterns from which all pieces will be cut. The marker is then laid on top of the layers of fabric and cut. Commercial markers often include multiple sets of patterns for popular sizes. For example: one set of size Small, two sets of size Medium and one set of size Large. Once the style has been sold and delivered to stores – and if it proves to be quite popular – the pattern of this style will itself become a block, with subsequent generations of patterns developed from it.[7]
Retail Pattern:
Home sewing patterns are generally printed on tissue paper and sold in packets containing sewing instructions and suggestions for fabric and trim. They are also available over the Internet as downloadable files.[9] Home sewers can print the patterns at home or take the electronic file to a business that does copying and printing. Major pattern companies such as Burda Style and independent designers such as Amy Butler distribute sewing patterns as electronic files as an alternative to, or in place of, pre-printed packets. Modern patterns are available in a wide range of prices, sizes, styles, and sewing skill levels, to meet the needs of consumers.The majority of modern day home sewing patterns contain multiple sizes in one pattern. Once a pattern is removed from a package, you can either cut the pattern based on the size you will be making or you can preserve the pattern by tracing it. The pattern is traced onto fabric using one of several methods. In one method, tracing paper with transferable ink on one side is placed between the pattern and the fabric. A tracing wheel is moved over the pattern outlines, transferring the markings onto the fabric with ink that is removable by erasing or washing.[10] In another method, tracing paper is laid directly over a purchased pattern, and the pieces are traced. The pieces are cut, then the tracing paper is pinned and/or basted to the fabric. The fabric can then be cut to match the outlines on the tracing paper. Vintage patterns may come with small holes pre-punched into the pattern paper. These are for creating tailor's tacks, a type of basting where thread is sewn into the fabric in short lengths to serve as a guideline for cutting and assembling fabric pieces.
Besides illustrating the finished garment, pattern envelopes typically include charts for sizing, the number of pieces included in a pattern, and suggested fabrics and necessary sewing notions and supplies.
Ebenezer Butterick invented the commercially produced graded home sewing pattern in 1863 (based on grading systems used by Victorian tailors), originally selling hand-drawn patterns for men's and boys' clothing. In 1866, Butterick added patterns for women's clothing, which remains the heart of the home sewing pattern market today.[citation needed]
Pattern Making
Pattern making is a highly skilled technique which calls for technical ability, and a sensitivity to interpret a design with a practical understanding of garment construction. For successful dress designing pattern making forms the fundamental step. This function connects design to production by producing paper templates for all components such as cloth, hemming, fusible etc. which have to be cut for completing a specific garment.
Pattern making is an art. It is the art of manipulating and shaping a flat piece of fabric to conform to one or more curves of the human figure. Pattern making is a bridge function between design and production. A sketch can be turned into a garment via a pattern which interprets the design in the form of the garment components. A pattern is flat while the body is not. The body has height, width and depth. Within this roughly cylindrical framework there are a series of secondary curves and bulges, which are of concern to the pattern maker. Darts are the basis of all pattern making. They convert the flat piece of cloth into a three dimensional form, which fits the bulges of the body.
A pattern maker typically makes a pattern from a flat sketch with measurements or a two dimensional fashion illustration. The basic pattern is the very foundation upon which pattern making, fit and design are based. The basic pattern is the starting point for flat pattern designing. It is a simple pattern that fits the body with just enough ease for movement and comfort.
Methods of Pattern Making
Pattern making involves three methods-
- Drafting
- Draping
- Flat paper pattern making
MEASUREMENTS
Bust – measure just under the arms around the fullest part of chest.
Waist – measure around narrowest part of torso.
High Hip – measure 6 inches [15.5 cm] below waist around the hips.
Back-waist length – measure from nape of neck to waist level
Shoulder length – measure shoulder from ball socket to side of neck.
Armhole depth – measure from nape of neck to under arm level.
Back width – measure from armhole to armhole across shoulder blades.
Neck – measure around base of neck.
Tools use for Drafting
A: Tape Measure
This is likely something you already have in your stash, because if you have been making clothing you should have been measuring your body along the way! If not, pick up a good quality fiberglass tape measure today so you can start your pattern making off right with correct body measurements.
B: Seam Ripper
Like the tape measure, you probably have a seam ripper. You will use this in patternmaking for taking out your basting stitches when you move from the muslin fitting to the pattern drafting stage.
C: Fine Point Sharpie Marker
Muslin versions are always ugly because they are marked up, but you want to make your markings with a permanent and fine point. I like these push-button fine point sharpie pens as the cap always seems to get lost in my studio! These are quick and easy to use.
D: Tracing Wheel
To take your markings from the muslin stage to the patternmaking stage, this tool will pierce through the paper and leave behind marks to draft with a mechanical pencil.
E: Rotary Cutter
I like using my rotary cutter for the big broad strokes of cutting muslin. Make sure to use a cutting mat beneath your item to protect the cutting surface of the table underneath!
F: Fabric Scissors
Sharp, high-quality scissors are used for all your fabric cutting in sewing and patternmaking. These will shape the muslin down to the proper size after you have cut it big and broad with the rotary cutter.
G: Tracing Paper
I personally do not use this, but many designers like it for leaving marks behind on their muslins. I like a sharpie or tracing wheel, but try these sheets out and perhaps you will love them! Many people do.
H: Scotch Tape
It is inevitable that you will need to tape pattern pieces together and I find that basic Scotch tape is the best for this.
I: Clear Rulers
Having a variety of clear rulers in different shapes and sizes is essential in your kit for patternmaking. I like having a little one for marking in tiny areas, long ones for making marks for pin tucks, side seam lines, and other parts of the patternmaking process that call for something longer than average. I also have a quilting square with diagonal lines for helping square up corners and creating angles.
J: Right Angle
This is also a huge help in creating perfect 90 degree angles on your pattern. These are also available in clear plastic, which most people prefer. I have had this black one since art school and still use it.
K: Curved Rulers
To shape arm holes, hip curves, hems and other lines that are not straight in patternmaking, it is essential that you have a few different curved rulers to get the proper slope in your pattern.
 |
| Tools use for Drafting |
 |
| Add caption |
03. Flat Pattern Making: It involves the development of a fitted basic pattern with comfort ease to fit a person or body form. A sloper is the starting point for flat pattern designing. It is a simple pattern that fits the body with just enough ease for movement and comfort. Five basic pattern pieces are used for women’s clothing. They include a snug-fitting bodice front and bodice back with darts and a basic neckline, a sleeve and a fitted skirt front and back with darts. However, as fashion changes frequently women’s styles fluctuate frequently. These basic slopers are then manipulated to create fashions. Nowadays draping is also tested by Computer aid techniques. A basic sloper has no seam allowances, which facilitates its manipulations to various styles. It has no design interest, only construction lines are marked on it. It is necessary that the basic structure of a sloper should be such that adjustments can be introduced easily. For a good pattern making, accurate measurements are of utmost importance.
 |
| Pattern making by CAD system |
